
dutch oven bread recipes! Have you ever dreamed of filling your kitchen with the intoxicating aroma of freshly baked bread, but felt intimidated by complex techniques and starter maintenance? What if you could create a bakery-worthy, crusty loaf with minimal effort and no fancy equipment? This incredibly simple no-knead dutch oven bread recipe is your gateway to homemade bread bliss, offering the perfect texture and flavor without the fuss. Cooking bread at home is not only deeply satisfying but also allows you to control every ingredient, resulting in a wholesome, preservative-free loaf that’s far superior to anything from a grocery store shelf. While many bakers seek a classic sourdough bread recipe, this method delivers similar artisan results with standard yeast, making it an accessible project for any skill level.
Ingredients & Supplies
Ingredients:
- 500 grams (about 3 ⅔ cups) bread flour or all-purpose flour
- 360 grams (about 1 ½ cups) lukewarm water
- 10 grams (2 teaspoons) fine sea salt
- 3 grams (about 1 teaspoon) instant or active dry yeast
Supplies & Tools:
- A 4 to 6-quart Dutch oven with a lid (enameled cast iron is ideal)
- Large mixing bowl
- Plastic wrap or a clean kitchen towel
- Bench scraper or spatula (helpful for handling dough)
- Parchment paper (optional but recommended)
- Kitchen scale (for precise measurements – highly recommended)
- Oven mitts (the Dutch oven gets extremely hot)
Optional:
- Rice flour for dusting (prevents sticking and gives a professional look)
- Spray bottle for misting (to enhance crust formation)
Timing/Cooking Schedule

- Prep Time: 15 minutes (plus 12-18 hours inactive fermentation)
- Cooking Time: 45-50 minutes (30 minutes covered, 15-20 uncovered)
- Total Time: Approximately 13-19 hours (mostly hands-off)
This recipe follows a “set it and forget it” schedule. Mix the dough in the evening, let it ferment overnight on your counter, and bake it the next day for lunch or dinner. Compared to a traditional sourdough bread recipe, this timeline is more predictable as it doesn’t depend on a starter’s activity.
Step-by-Step Instructions
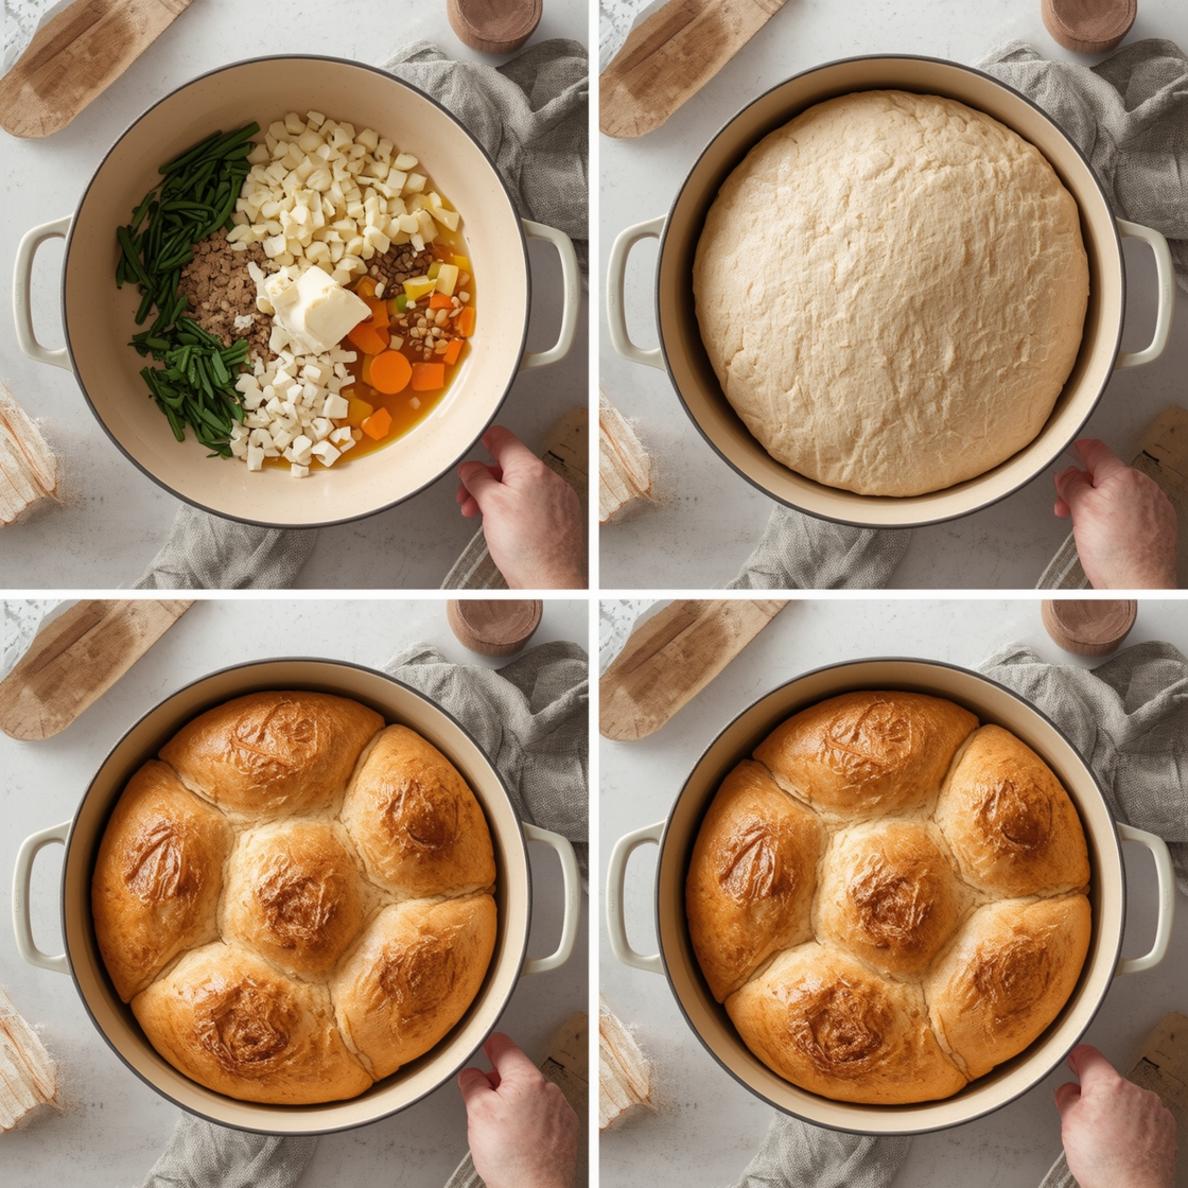
1. Mix the Dough: In your large bowl, whisk together the flour, salt, and yeast. Add the lukewarm water and stir with a sturdy spoon or your hands until a shaggy, sticky dough forms and no dry flour remains. This is the only “kneading” required for this remarkable dutch oven bread recipe.
2. First Rise (Bulk Fermentation): Cover the bowl tightly with plastic wrap or a damp towel. Let it rest at room temperature (68-72°F is ideal) for 12 to 18 hours. The dough will become bubbly, double in size, and have a slightly domed surface.
3. Shape the Loaf: Lightly flour a work surface and your hands. Gently scrape the dough out onto the surface. Without punching it down, fold the edges into the center to form a round, taut boule (ball). Let it rest seam-side down.
4. Second Rise: Place a sheet of parchment paper in a medium bowl (or use the same mixing bowl, cleaned). Transfer the shaped dough, seam-side up, into the bowl. Cover loosely and let it rise again for 1-2 hours, until it has puffed up noticeably.
5. Preheat and Bake: About 30 minutes before the second rise is complete, place your Dutch oven with its lid on inside your oven and preheat to 450°F (230°C). Once hot, carefully remove the pot. Using the parchment paper as a sling, lower the dough into the pot. Score the top with a sharp blade.
6. Bake: Cover with the lid and bake for 30 minutes. Remove the lid to reveal your transforming loaf and continue baking, uncovered, for another 15-20 minutes until the crust is deeply golden brown.
7. Cool: This is crucial! Transfer the bread to a wire rack and let it cool completely (at least 2 hours) before slicing. This allows the interior crumb to set properly, just as you would with a sourdough bread recipe.
Nutritional Benefits/Advantages
This homemade bread is free from artificial additives, preservatives, and excess sugar commonly found in commercial loaves. Using simple, whole ingredients means you know exactly what you’re eating. The long, slow fermentation can also make the bread easier to digest for some people, as it helps to partially break down the gluten and phytic acid present in the flour.
Tips, Alternative Methods, or Cooking Advice
- Flour Variations: Substitute up to 1 cup of bread flour with whole wheat, rye, or spelt flour for a heartier flavor and texture.
- Add-Ins: After the initial mix, incorporate a handful of chopped rosemary, olives, sun-dried tomatoes, or seeds.
- No Dutch Oven? Use any heavy, oven-safe pot with a tight-fitting lid, like a ceramic casserole dish or a deep stainless-steel pot.
- For a Softer Crust: Brush the loaf with butter or olive oil immediately after removing it from the oven.
- Using Active Dry Yeast: If using active dry yeast (not instant), you may want to proof it in the lukewarm water for 5-10 minutes before adding it to the flour mixture.
Common Mistakes to Avoid (H2)
1. Skipping the Scale: Volume measurements for flour are highly inaccurate. A kitchen scale is the single best investment for consistent baking success.
2. Using Hot Water: Water that is too hot will kill the yeast. Lukewarm (around 100°F) is perfect.
3. Not Preheating the Dutch Oven: The hot pot is essential for creating an instant burst of steam, which gives the loaf its signature crackly, professional crust.
4. Cutting Too Soon: Cutting into a hot loaf releases steam and turns the interior gummy. Be patient!
5. Over-flouring During Shaping: Use a light hand with flour when shaping. Too much will create a dry, tough layer on the baked crust.
Storage/Maintenance Tips
Store the completely cooled bread at room temperature, wrapped in a bread bag or cloth, for up to 3 days. For longer storage, slice and freeze in an airtight bag for up to 3 months. To revive, toast slices directly from the freezer, or thaw the entire loaf at room temperature and refresh it in a 350°F oven for 5-10 minutes to restore the crust.
Conclusion
Mastering this no-knead dutch oven bread recipe empowers you to create stunning, artisan-quality loaves with astonishing simplicity. The method proves that you don’t need a sourdough starter to achieve a fantastic, flavorful crust and open crumb—though it might just inspire you to explore a classic sourdough bread recipe next! The real magic lies in the transformative power of time and the consistent heat of your Dutch oven. Now it’s your turn. Gather your ingredients, embrace the slow process, and bake your way to bread-making confidence. We’d love to see your results—share a photo of your beautiful loaf in the comments below!
FAQs (H2)
Q: Can I shorten the fermentation time?
A: You can reduce the first rise to 6-8 hours by using a slightly warmer spot in your kitchen, but the flavor and texture will be less developed. The long, cool fermentation is key to the recipe’s complex taste and chewy texture.
Q: My dough is very wet and sticky—is that normal?
A: Absolutely! This is a high-hydration dough, which is what creates those beautiful, irregular holes in the crumb. Wet hands and a light dusting of flour will make handling it much easier.
Q: Why do I need to bake it with the lid on?
A: The covered Dutch oven traps the steam evaporating from the dough, creating a humid environment. This allows the loaf to expand fully (oven spring) before the crust hardens, resulting in a better rise and a shatteringly crisp crust.
Q: Can I make this recipe gluten-free?
A: This specific method relies on gluten development. For a gluten-free version, you would need to use a specific gluten-free flour blend designed for bread and likely add binders like xanthan gum, following a dedicated gluten-free recipe.
Q: What if my bread is dense and didn’t rise well?
A: This is usually caused by expired/inactive yeast, an overly cold environment during the rise, or using a flour with low protein content (like cake flour). Ensure your yeast is fresh, your water is lukewarm, and you use bread or all-purpose flour.